Many types of baby fish, including goldfish, grow best on a diet of live baby brine shrimp. Baby fish, also called “fry” eat baby brine shrimp readily because the movements of the shrimp entice them to eat. Baby brine shrimp are also good for fry because they are high in protein, are easily digestible, and can survive for hours in the fry tank, giving the fry a more continuous food source. Hatching baby brine shrimp is fairly simple and it’s easy to make a brine shrimp hatchery on your own. Here are step-by-step instructions showing how to construct your brine shrimp hatchery and how to raise the brine shrimp.
Materials You’ll need two 1-liter bottles, an air pump, a lamp, flexible airline tubing, rigid airline tubing, brine shrimp eggs, baking soda, and salt (kosher salt, canning and pickling salt, rock salt, or any non-iodized and additive-free salt will work fine).
Step 1 Carefully cut the bottom 1-2 inches off of one bottle and discard the bottom piece. This will be inverted to become the reservoir to hatch the brine shrimp in. Brine shrimp hatch best when they are continuously circulating, so the inverted bottle is a good shape to hatch brine shrimp in because there is no bottom surface for them to settle on.
Step 2 Next, carefully cut the bottom 6 inches off of the second bottle and discard the top piece. This second bottle will become the base for the hatchery. Put the two bottles together so the second bottle supports the first in an upside-down position. And if you like, you can tape them together for extra strength.
Step 3 Cut a length of rigid airline tubing to roughly the same height as the reservoir bottle and attach a length of flexible airline tubing to it.Attach the other end of flexible airline tubing to an air pump.The rigid airline tubing should be placed into the hatchery reservoir so that the end of it is right at the very bottom of the bottle.
Step 4
Fill the reservoir about 4/5 of the way full with warm tap water. There is no need to use dechlorinator. Turn on the air pump. Add 1 level tablespoon of salt and just a pinch of baking soda (to help keep a stable pH).
Step 5
Now you can add your brine shrimp eggs. Make sure you buy eggs with the best hatch rate you can afford.
Step 6
Turn on your lamp and position it directly over the hatchery. This is done because; a) brine shrimp need a constant light source in order to hatch, and b) it also helps heat the water so the brine shrimp hatch faster. If kept at 78-80 degrees F, after about 24 hours the brine shrimp should all hatch.
Step 7
Check back in 24 hours… you’ll know the brine shrimp have hatched when the color of the bottle turns orange from the color of the brine shrimp themselves. At this point, turn off the air pump and allow the hatched brine shrimp to settle to the bottom of the bottle. If you position the light source so that it’s aimed right near the bottom of the bottle, the brine shrimp will settle to the bottom faster because they’re attracted to the light.
Step 8
Remove the brine shrimp (and avoid the egg shells) by using a turkey baster to suck them up directly from the bottom of the bottle. Alternatively, you can use a straw by placing one finger over the end of the straw and putting the straw right to the bottom of the bottle. When you release your finger, the straw will suck up the water right from the bottom, bringing the hatched brine shrimp along with it. Place your finger back over the end of the straw to transport the brine shrimp to the fry tank for feeding.
Step 9
Rinse out the hatchery and start the process over again. In fact, it’s a good idea to start a second batch 12 hours after starting the first one so your fry can have a fresh meal every 12 hours.
I also have a video that walks you through each step. Check it out below!
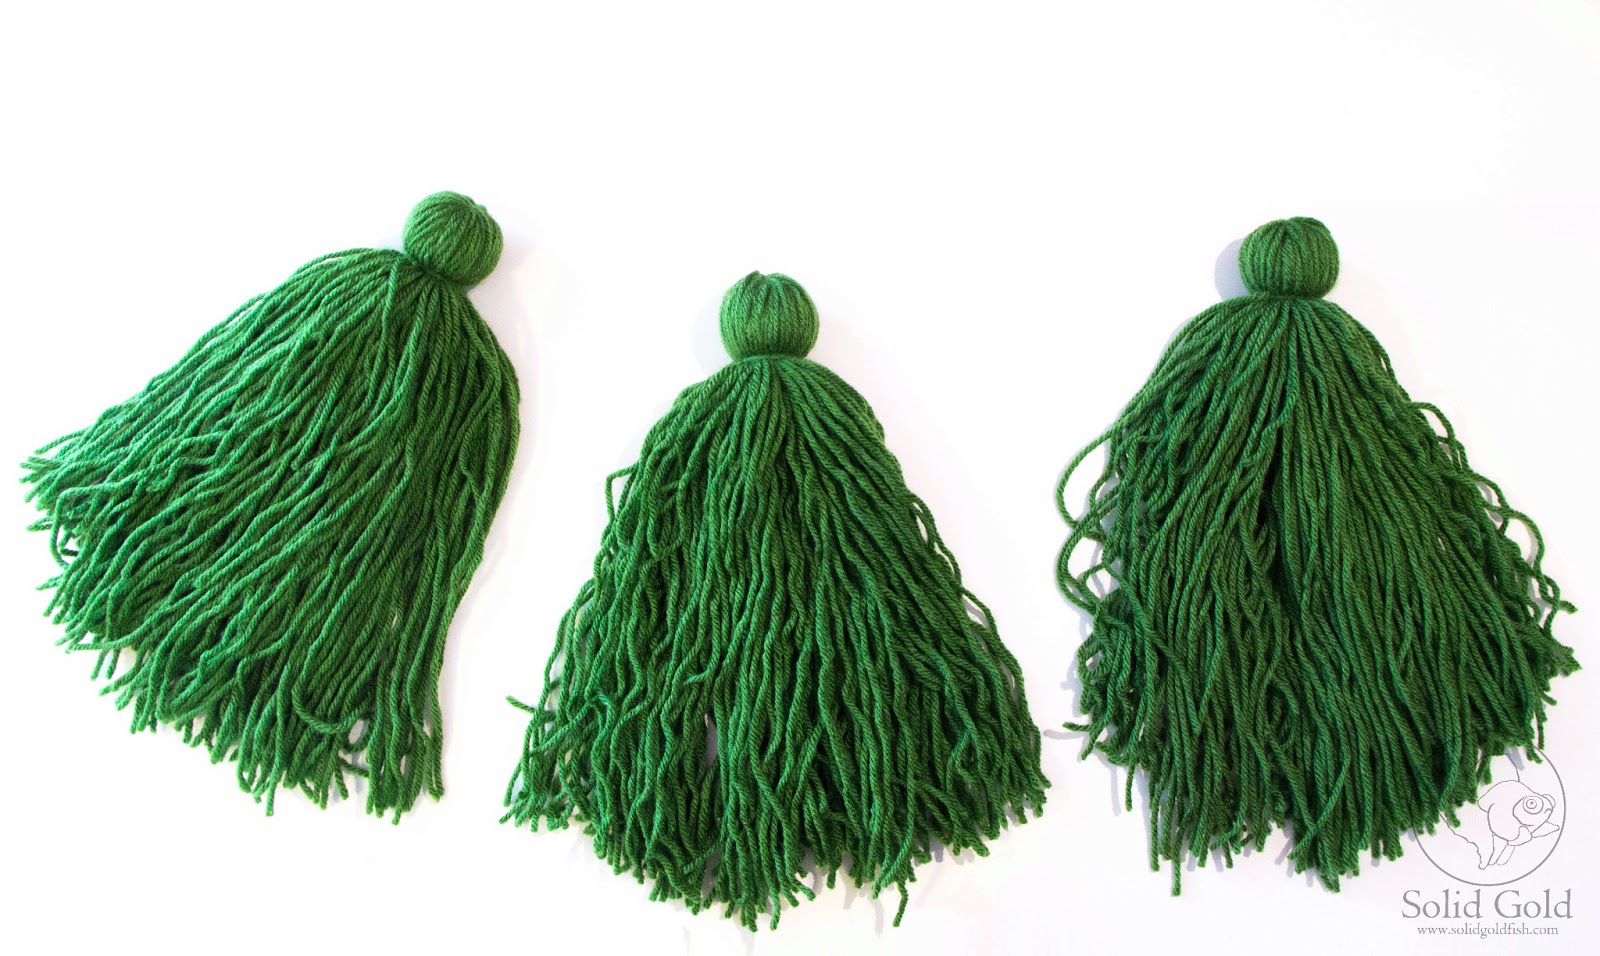
When goldfish breed, the male fish drives the female into soft plants so that when the eggs are laid, they get stuck in the plants and they can develop safely. Rather than using live plants all the time, many breeders simulate plants by making what are called spawning mops. These are handy because they can be easily removed to a fry grow-out tank when spawning is finished, and they can be sterilized after use, unlike live plants. This guide will show you a cheap and easy way to make your own spawning mops.
Materials You’ll need some acrylic yarn in any color you’d like. But just keep in mind two things; first, eggs will be much easier to see on a darker color, and second, some people think that fish breed more readily on green yarn since it looks like real plants. You’ll also need scissors, tape, some cork bottle stoppers, and a hardcover book. The book should be almost as tall as the aquarium you’re going to use the mops in.
Step 1 Cut off a length of yarn and lay it horizontally across the book. Use a couple pieces of tape to hold it in place while you work.
Step 2 Begin winding the yarn vertically around the book. Go around about 100 times. You can do fewer or more times depending on how thick you want your mop to be.
Step 3 Move the horizontal piece of yarn up to the top of the book, and use it to tie a knot at the top.
Step 4 Take your scissors and cut the yarn at the bottom of the book.
Step 5 Take a cork, place it in the middle of your mop (where the knot is) and fold the mop in half to completely cover the cork. Then, while holding the top tight with one hand, tie a length of yarn around it to keep the cork held securely in place.
Step 6 Boil some water in a large pot. Once it has reached a rolling boil, remove the pot from heat and soak your spawning mop in the hot water for about 15 minutes. Do not leave the pot on the heat while the spawning mop is soaking, because the boiling water will tangle the threads of the mop and it will be difficult to fix. I found this out the hard way. After it has soaked, rinse it off in cool water, and it’s ready to use!
Even my cat, Sami, approves!
If you prefer a video demonstration, feel free to check out the video version of this guide as well!
While decorating your home for the holiday season, why not decorate the fish tank too? Here are some ideas to get you started!
For Inside the Tank As always, choices for decorations inside the tank are limited because you need to make sure the decor is safe for your fish. Goldfish in particular tend to be pretty clumsy swimmers, so avoid anything with sharp edges and rough surfaces. Also remember that hollow decorations are not ideal because water can become stagnant inside them. With that in mind, here are some aquarium-safe decor ideas!
Flat Glass Marbles For a quick and easy pop of festive color, I like to lightly scatter some glass marbles on the tank floor. For Christmas choose red, green, and/or white colors. Whether you have a bare-bottom aquarium like me, or you have substrate in your tank, these glass marbles add accent colors that really help establish the theme of your decor.
Glass Decorations There are many different types of home decorations made of glass. As long as they are solely glass with no extra paint, glitter, or anything on them, these are aquarium-safe. Peruse your local thrift stores to see what glass treasures you can find! Santas, reindeer, Christmas trees, and snowflakes made of glass would all make great aquarium decorations! I found some solid glass Christmas trees and some hollow glass Christmas trees at my local thrift store. The hollow ones can be made more aquarium-friendly by putting something heavy inside of them so they sink, sealing them with aquarium silicone, and allowing the silicone to cure fully. This seals the glass decoration up tight so that you avoid water getting trapped inside it and becoming stagnant. Alternatively, you could consider drilling small holes; one at the base and one at the top, of the hollow ornament and placing an air stone inside it. This will allow water to flow freely through it continuously. Please take extreme caution when attempting to drill holes in glass objects, and if you aren’t comfortable drilling glass, then either get help from someone experienced or do not attempt it. When in doubt, opt only for solid glass decorations. Solid Glass Christmas Trees:
Hollow Glass Christmas Trees:
Christmas-themed Decorations Made for Aquarium Use As we near the holiday season, some pet stores may begin carrying Christmas-themed tank ornaments, and any of these would be fine for your aquarium. As always, take care to stay away from sharp, rough, or hollow ones. For Outside the Tank This is where we can get a little more creative because decorations outside of the tank pose little to no threat to the health of your fish.
Fake Snow and/or Frost Avoid using spray-on fake snow on the outside of your tank because it’s not a good idea to spray aerosols near the aquarium. Also, it may be difficult to fully remove from the glass when the holiday season is over.
If you want the fake snow look without using spray-on snow, you can opt for a roll of cotton fake snow. This can be cut in pieces and assembled together on your tank to resemble rolling snow-covered hills. Or you can wrap the base of your tank with the fake snow. The possibilities are endless!
To get that frosty window look on your aquarium glass, you can actually use epsom salt! Epsom salt is non-toxic and can be found in the pharmacy department of many stores. All you need to do is dissolve some epsom salt in hot water, add a little bit of dishsoap, allow mixture to cool, and paint it onto your aquarium glass (on the outside of course). As it dries, the epsom salt forms crystals that resemble frost on windows. After the holiday season is over, the glass wipes clean with a wet rag. Here is my video tutorial that shows how to do this:
Window Clings Window clings can be found in a wide variety of Christmas themes, and they also come in either gel or vinyl forms. Use snowflakes, santas, Christmas trees, snowmen, or any number of Christmas-related window clings! If you are DIY inclined, you could also make Christmas-themed cutouts with construction paper and tape them (using an easily removable tape) to the glass.
Christmas Stockings For a personal touch, you can buy or make some miniature stockings for your fish! They can even be customized with the names of your fish either by using fabric pens or by stitching with thread (as I have done). Then just hang the stockings from either the tank or the tank stand. Here are my handmade stockings.
Get Creative! Get creative and see what else you can come up with to decorate your tank this Christmas!
Okay, so I know it’s not even Thanksgiving yet and nobody wants to think about Christmas, but I have already been brainstorming about ideas for my Christmas-themed tank decor! I thought it would be super cute to have miniature stockings hanging on the tank with Clover and Callisto’s names on them, and today I made it a reality! I hand-sewed a couple of tiny stockings out of red and white felt, and then I stitched on their names with green thread. I like how they turned out to have a handmade and cutesy look! I also picked up a few more items for my Christmas-themed decor, but I’m going to keep those a secret until the big reveal.
I think I’ve reached a whole new level of obsession.
The tank is finally finished! The company I ordered the check valve from sent me the wrong size by accident, but I was still able to make it work. The fish seem very happy to be in their new home, and I’m happy to not have a big tub of water sitting on my floor anymore. 🙂
I made some progress on my 55 gallon tank setup! Now I’m pretty much just waiting on a few more parts and waiting for the silicone to cure before I can set it up.
Here I’m siliconing the acrylic parts into the sump. I used some books and rolls of tape I had laying around to support the pieces while they dried.
This is how I attached the UV sterilizer to the tank. I used two PVC pipe hooks, and attached them to the back of the stand. The UV fits perfectly.
Here’s a zoomed-out view.
Then I attached the hoses. I couldn’t quite finish this part because I still need a check valve, which is coming in the mail.
This is where the drain hose meets the sump. I used PVC glue to attach the PVC to the bulkhead, and then clamped the hose onto the PVC elbow.
And here’s a view from the front with the doors open.
The aquarium store finally finished the parts for my sump! However, there was a major miscommunication or something, and it’s not exactly what I expected. I think I can still make it work though. I found out the reason why they took so long too; apparently they aren’t doing well financially and may even go out of business soon, so things have been really haywire there in the past month. So I just decided to take what I could get as far as the sump goes, because if I rejected what they made I would be back to square one. With fish waiting for the tank to be ready, I just can’t afford to do that! My main concern is that the sump is only a 10 gallon tank, which everyone says will be a problem because it will evaporate quickly. I’ll just have to keep an eye on that and be sure to top it off between water changes. So anyway, I can finally begin the assembly and get my new broadtails set up in the 55 gallon tank!
Here’s the tank with all the parts I need to assemble.
Sump parts.
Here is how it will look once assembled. The chamber on the left will be full of bioballs, I just don’t have them yet.
Meanwhile, I’m happy to report that the two broadtails are doing really well!